Monday 16 May 2011

The Final Module. Storyboard - Commercial

Back in January, we were handed a rather thick brief, which was made up of the units for our final module.

The first Unit was a 'storyboard' - we had a selection of briefs to chose from, listing different 'products' and a description of how the companies involved wanted them represented in an advert.

I chose the 'KitKat brief'.

KitKat - remains the best selling chocolate snack. To extend their domination of the market, Nestle have brought out a series of different flavours and wish to bring this to the attention of customers. The main thrust of the campaign will be based on the tie line "What colour are you" . They are interested in a campaign in which the wrapper acts as a signal to  potential partners by showing each other that you have much in common.  They want attributes attached to each of the flavours, and your choice indicates your personality. They hope they can develop a fun spark, a surreptitious language, a new language of love spoken tongue in cheek.  This commercial needs to explore this aspect .


Storyboards are not my favourite type of project. I'm not confident enough of my drawing skills to be completely comfortable with them, but they are really effective for conveying an idea to a potential customer, and I've been surprised how using them pushes me to give far more consideration to several things - film language, how one shot moves into another, the flow of the narrative and how, once I have it completed, it gives me a really clear idea of how the 'finished product' is supposed to look.

I've also learnt that when given a brief like this , the research aspect is vitally important - I started off looking at adverts that have produced a 'tie line' that has captured the public's imagination - when I started to think about it, so many 'tie lines' become part of peoples everyday conversation and interaction.  For example,
L'Oreal - 'because your worth it', and one that I felt had already captured the sort of 'fun spark' that the brief required, Tictacs - 'Shake your Tictacs' .

Looking at different parts of the brief, I extended the research into other area's.  Firstly I looked at what other flavours KitKat had used, worlwide, and was amazed at the variety out there . . .


Then in looking at the 'tie line', "What Colour are You' , I researched on line what , if any, characteristics were associated with different colours.

  There was a lot of information out there . . .


I also listed the different flavours that could be associated with the different colours, and then, combined them with the characteristics, e.g - Red - strawberry, cherry - passionate, fiery, sexy; Blue - blueberry - calm, mysterious.

From this I moved onto considering locations where these colours would dominate, and which would also be a suitable environment for the characteristics associated - for example, Green, apple, nature lover, dreamy, tree's, fields,etc.

Then I started to consider the 'fun spark' and the 'language of love' - how to convey this? Could it be by the actions of the 'couple' featured - instead of 'shaking tictacs', maybe they could 'flash a kitkat'? However, the 'tictacs' advert, to me, was just too 'cheeky' and lacking in the 'romance' feel that I felt was suggested by the 'language of love' comment in the brief. So, could the fun spark be in larger than life personalities that reflect the characteristics of the colour?  I began to consider that instead of using people, what about using animals, cartoon animals? Different animal couples for each colour/flavour? For example, you could associate a lion, king of the jungle, with the colour purple - purple for royalty, but also for passion and pride. And cartoons are fun - they can also be portrayed to emphasise the characteristics associated with the colours, and they can be sexy, flirty, attractive, romantic, cute . . .


I jotted down a few basic 'story lines', using the research, different colours/flavours and different animals for a series of adverts - Orange is associated with activity, energy and that could be typical of a sporty, outgoing character - so how about the animals being Tigers? Tigers are sleek, sexy and strong, athletic even. Or Yellow - monkeys with yellow tinted fur, meeting on a yellow beach, tropical, fun & sun loving setting. In each ad, it could be a case of they see each other, but only make a move when one or the other produces the 'kitkat' and that would be the final signal to indicate that they belong together? The fact that you can manipulate and tamper with 'reality' with cartoons, to a certain extent, means that there are less limits to the scenes you can use and the actions of the characters - you can exaggerate, in a way that wouldn't necessarily work with 'humans', to emphasise the message in the advert.

After looking at several different types of cartoon animals, I decided to use squirrels for the ad I would storyboard out . . .


 I especially liked this last one, which I thought was fun and flirty, and demonstrated clearly how a cartoon could work .


I decided on using a peanut flavoured kitkat in a yellow wrapper would work with cartoon squirrels - Yellow for sunny, warm, outdoor type personalities, with an association with summer days and romance . And peanuts - nuts and squirrels - gave it an added association.

Before I started drawing and plotting out the story, I also looked at photographs of actual squirrels -although, as I said, I felt the cartoon idea would allow manipulation and exaggeration, I knew for it to work, the characters would have to have a basis in reality.


I also created a mood and a colour board . . .


I also thought about using music, and felt an appropriate piece for this ad, as there was to be no dialogue, would be the song 'True Colours' - but I felt the arrangement of the song could be changed to go with the colour/characteristic of each individual advert.


And then onto the drawings!

The storyboard has to plot out the narrative of the project, and each frame contains written information on the type of shot and camera angle used


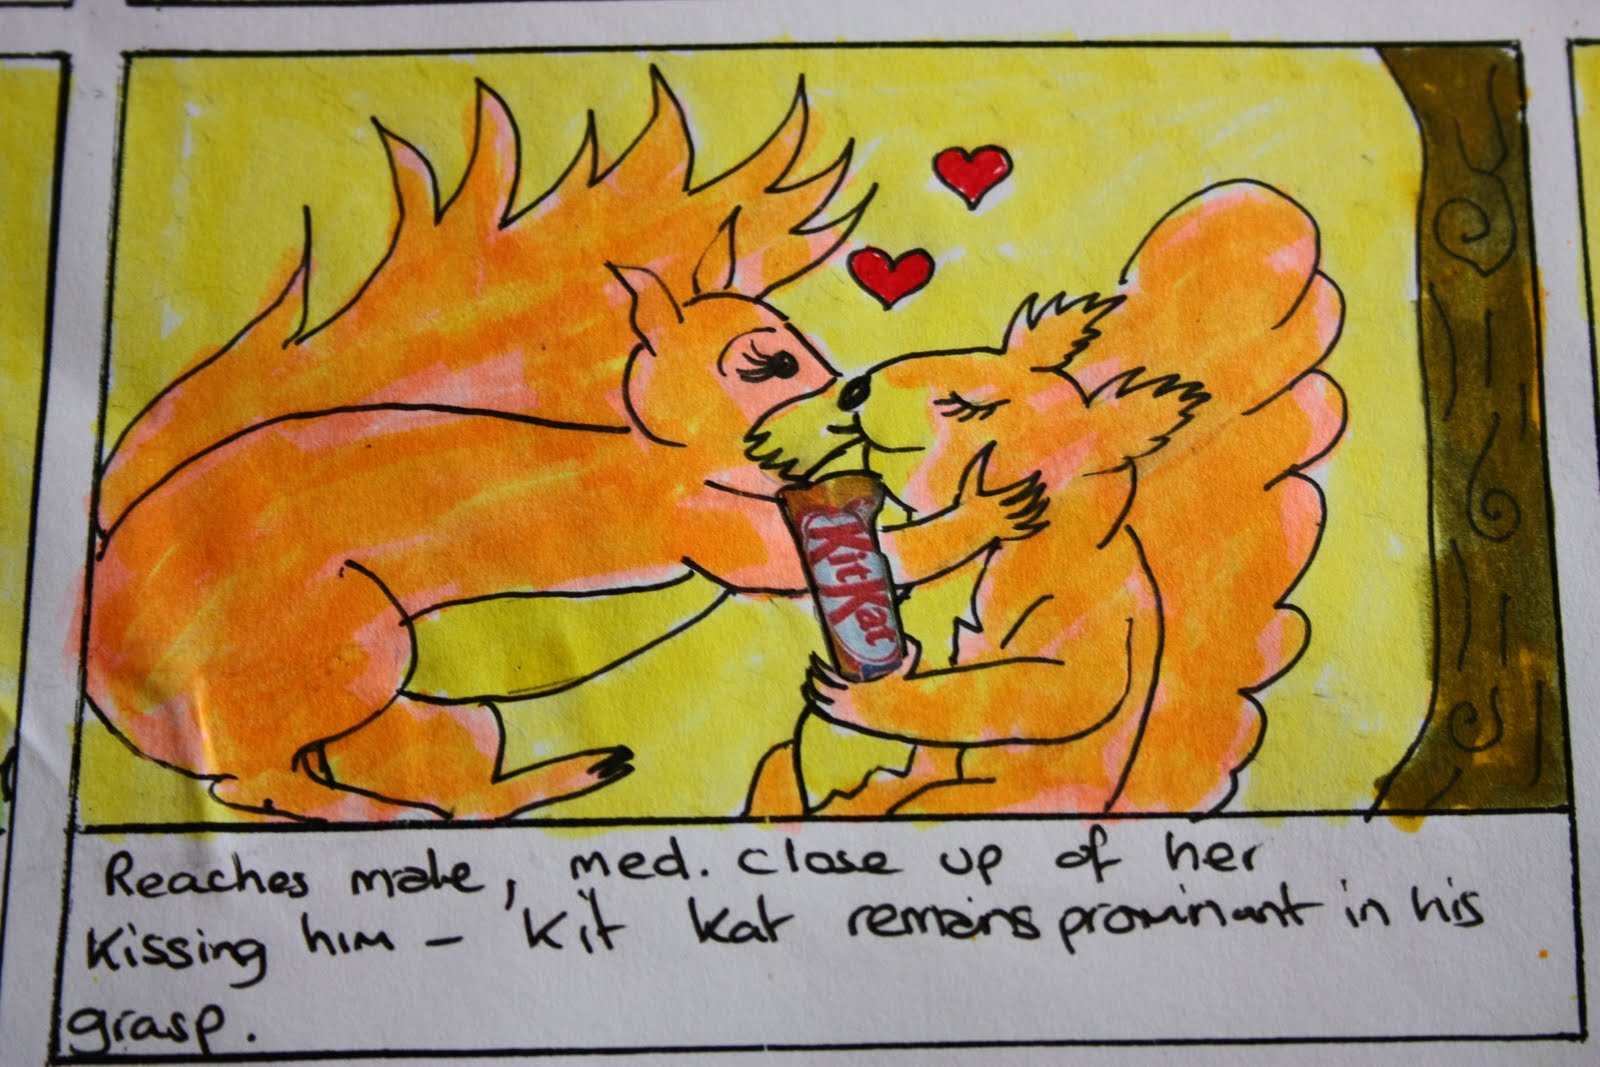
I deliberately used a yellow tone to virtually every component of the drawing, to emphasis the link to the colour - even the squirrels have a yellow tone to their fur - one of the 'manipulations' you can use with cartoons.


I also decided to use printed pictures of a peanut Kitkat, inserted into the frames - if this aspect was incorporated into a finished animation, I felt it would emphasise what the advert was about to the viewer, so that the concept of using the product as a 'new language of love', i.e that the product was a 'visual' indication of characteristics that match,  would be more firmly linked in their minds.

The Finished storyboard . . .


With no dialogue, I made the final frame to be a shot of the peanut KitKat, with the sun and flowers to emphasise the characteristics, and the Tie Line prominently displayed, and for added emphasis, I decided to introduce a voice at this stage that would simply say 'KitKat - What Colour are You?'.


In this unit, I was able to bring together several of the concepts/tools that I have been introduced to over the last year - the different types of angles and shots that can be used, and when to use them; The use of film language and frames to clearly set out the concept; How using colour/mood boards can really help you to create the 'feel' you want for an idea; The use of music and sound to enhance, and to aid, the visual aspects you have used to convey a narrative/atmosphere/feel.  It again brought home to me how storyboards are a really good way to present an idea in a clear way - my lack of drawing skills may make the actual production of the finished item seem like hard work, but I enjoyed the research aspect of it and actually coming up with the ideas for how the brief could be fulfilled in an advertising campaign.

Next Unit - Stock Photography.

The Final Module : Stock Photography

The next unit comprised of several different photographic projects - the first one being stock photography.

Stock images are images that are posted somewhere with the express intent that it may be used by other artists in their own artwork.

I had been given a beautiful Pandora bracelet as a Christmas gift, and this gave me the idea of using jewellery, particularly necklaces/bracelets, as my subject for stock.

I researched stock images of jewellery on the internet, and noticed that there seemed to be several ways of displaying jewellery for this type of photography.


      A plain background was favoured for many of the shots . . .


. . . and white seemed much preferred .


There were also other examples, such as displaying the products with other items


Or displayed actually on the body.


(all the above images were found on google images that I looked at for research)

I booked 3 studio sessions in total, and also did a couple of test shoots at home, to experiment with the various styles I had researched, and to see if I could come up with something I liked.

These are some of the images I shot at home . . .


I experimented with different backgrounds, but was - in virtually all of them - not happy with the lighting, though there was one that I liked enough to use in my final selection.


So, I moved onto working in the studio.

Colin was really helpful here, as I had had very little experience of using a studio for anything other than human subjects, and he helped me set up the lighting at first.

I firstly experimented using black velvet as a background for the jewellery to sit on . . .


But I didn't think that this showed off the jewellery to its best advantage, and I also thought it was pretty boring !

So - I tried adding other objects . . .


And photographing them from different angles and distances


I felt these images were more interesting, but I was really not happy with the black background - I did however, like the reflection, and wondered if I could perhaps move forward using a combination of reflections and a white background.

At this point, Colin suggested that I experiment with the tungsten light set up, so having bought a piece of white cotton, and borrowed a large mirror, I tried some more shots.


But - I didn't like these either !


So then I tried sitting the jewellery actually on the mirror


This was much closer to an effect I was happy with.


I also tried shots on a plain white background, and sitting the jewellery on a sheet of perspex, using high key studio lighting


And again, I was pleased with these, feeling that the white background worked far better.


I again tried introducing other objects . . .


But I felt like the inclusion took away from the impact of the jewellery.

So, I went back to using the tungsten and mirror, and high key lighting on a white back drop, shooting close up details as well as the whole object,  and eventually came up with 6 images that I liked and that I felt fulfilled the brief.


I like the 'crispness' of the images, despite the reflections in some - and the reflections I felt gave a greater 'interest' to the images.

In researching stock further, I found that there are strict rules regarding copy write and so on - so unless the Pandora bracelet that I used for one of these images was especially commissioned by, or taken with the approval of, the company concerned, I couldn't actually use it for stock if I intended to benefit financially from it.

It was interesting to work in the studio with 'products', rather than a person, for a change.  It presented different challenges, to make an inanimate object 'interesting', and I really enjoyed experimenting with different lighting to create images I was happy with.

The Final Module: Joiners

This for me, was an 'old friend' revisited. I had chosen the theme 'Connected images' as my exam piece, for my AS level in early 2010, and I had become fascinated, and highly appreciative of the Joiner works of David Hockney, and several other artists who had chosen to work in this form. I particularly liked Hockney's 'Pearblossom Highway'


The brief advised us to look at other examples of Hockneys work, specifically, The Desk -


And 'Work Trolley', which I was unable to find an image of, despite several searches.  However,  'The Desk' like  'Pearblossom Highway' , other Hockneys and also the work of Noel Myles, which I also re-visited, re-awakened my fascination with this style of work.

I love the distortion of perspective - with Pearblossom Highway, you initially look at what appears to be a representational piece, but then you look again and the distortions starts to jump out at you,  and you find yourself looking again and again, noticing each time the slight skew, and also, with this piece, how its captured the passage of time and the movement in the landscape.  'The Desk' demonstrates the distortion of putting a 3 dimensional view/object into a  2 dimensional  image, even more.

Having experimented extensively with joiners before, I had tried printing out the individual pictures and sticking them down, overlapping them, to create a final piece. However I felt that the uneven surface of the final piece detracted from the the distortion in perspective that I especially wanted to show, and after a lot of 'trying out' of different methods, I eventually started to use a programme called picasa, which allowed me to arrange the photographs as I would if I was using individual pieces physically placed together , but produced a 'flattened image' which allowed the distortion and movement that I wanted to show.

I looked again at several of the pieces I had created for my AS level, as 'practice' pieces -


And at the 3 pieces which led to the final image


   These were going to be my final pieces, until several fellow students and friends said that the 'Kitchen Window' left them wondering what was beyond the window - and that they had found themselves craning their necks and looking at the picture from different angles as the distortion led them to feeling that they could 'see through' the window.


So, I decided to try and create a 'through the window' view . . .


 I was really happy with this image, as the photographs were taken over 3 days, and I felt the differences in the sky showed this. The appearing of my dog in two different places captured a sense of the movement that I loved in Pearblossom Highway, and the lines of the flagstones gave the sense of distortion that I particularly like in this sort of image.  I also really liked the reflections in the garage windows.

So - to tackle this subject again !

In looking at the desk, I thought I would try and focus initially on an object, and chose something simple for a practise run


Although I loved the distortion of space and lines, I didn't feel that this captured the sense of movement and change and time passage that I really find fascinating about this style.

I looked again at the work of Simran Gleason, who had produced 'joiners' of tree's that I also liked very much


 I liked the sense of movement in these pictures, and had decided to try a 'joiner' of a tree - then we had 3 or 4 days of high winds, and on the second day, looking out, I watched the 15 foot high cordeline in the garden being battered and - it turned out later - being destroyed by the weather. Well - here was a subject that would hopefully capture the sense of movement, and time passing that I so liked - and that would also capture an 'event', so grabbing my camera, out I went.  The resultant image comprised of pictures taken over 3 days, and moving left to right across the image shows the tree going from fully 'leaved' to battered and bald as the wind damaged it.


I had virtually decided to make this my final image, but a couple of weeks afterwards, I made a visit to one of my favourite 'photo' spots, the Ffrwd. I have a habit of sitting by the pond there and taking photograph after photograph of the view before me - I absolutely love the reflective qualities of the pond, and the way the sky and surrounding tree's are shown in it. And that brought me back to how I had liked the effect of the reflections in the window in my AS piece - so I started to take photographs for a joiner of the Ffrwd.  I made two visits in total, on one day the sky was the most amazing blue, and on the second, a rain fall was rolling in, and the sky was stormy looking and grey. To take it one step further, I took photographs using two different lens, 17 - 55ml, and 70-300ml zoom - I wanted to see if I could combine the two to make an image that was still representational, but in which the distortion was further emphasised and enhanced.

I am really happy with the final image


Using the two different lenses really increased the sense of distortion - though it also made it more difficult to put the piece together - and by changing the size of the photographs I used, it meant I could put more detail into parts of the picture, particularly in the pond reflections.  Although this doesn't give the sense of 'flattening out' a 3 dimensional image that 'The Desk encapsulates, I like the way the combination of photographs and different focal lengths,  aids the creation of 'depth' in the image.

Next: The Final module: Typologies.